
Tetris NES, Deep Dive #1
The Story so Far…
This was a school project during my last semester of college, for a reverse-engineering class. Me and another student worked together to try and add new mechanics to Tetris, the version released for the NES. Honestly, my original report does a pretty good job explaining it:
“Tetris is one of those classic games everyone knows about, and the version built for the Nintendo Entertainment System (NES) is one of the most famous renditions of that classic! However, this game was created in 1989, just two years before the Standard Rotation System (a system nearly all subsequent Tetris games followed) was created. As a result of this, the NES version used its own system that is significantly different from its successors. In this project, we intended to add in as many aspects of the Standard Rotation System (SRS) as much as possible. This revolved around two major features: adding in missing piece rotations, and adding in wall-kicking!” Me, trying very hard to ‘write good’
That’s right, this version of Tetris is actually missing pieces so to speak, and can seen quite plainly when you look at all possible rotations in the game:
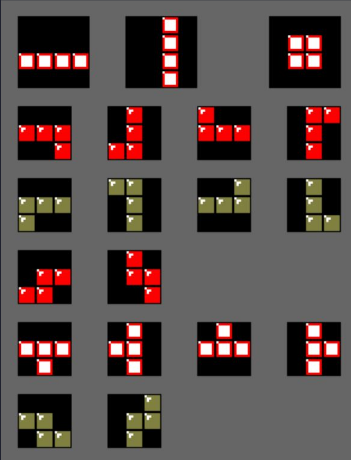
It becomes quite clear that we’re missing rotations for the I, S, and Z blocks (top to bottom). In reality, these blocks should have 4 rotations like so:
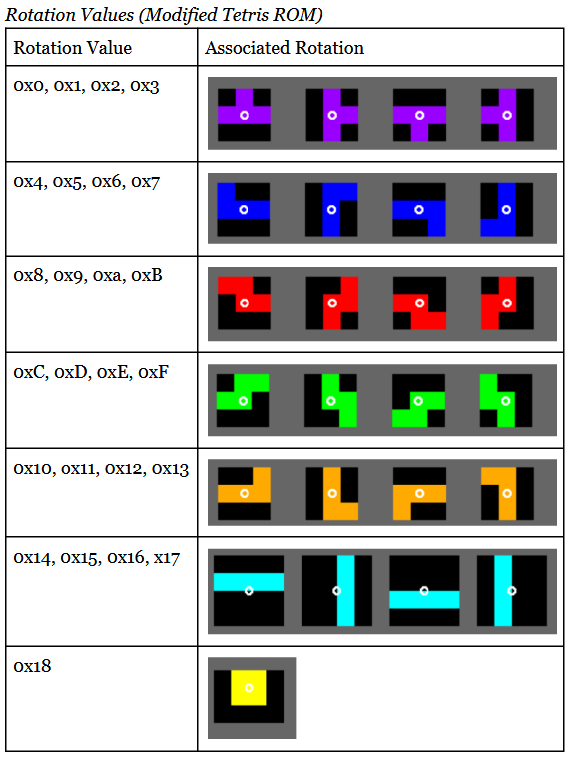
This is actually also taken directly from our final report, and shows my final plan for adding these pieces to the game. However, due to certain problems with NES hardware (that I fully intend to explore in a future post), this was not entirely feasible. I was able to get all the new rotations, but had to remove the I-block from the game.
All in all, I look back on this project with a lot of pride, but also shame that I never got to reach my full vision.
Why bring up the story now?
As much as I would love to only focus on the new and exciting systems and projects that I’m working on that aren’t implemented like a monkey to a typewriter, I feel that would do a disservice to this Antholog. Looking back at what went wrong is important, and it makes us human.
I actually do plan to finish this project, for the time being at least! The worst part about this project was that I had very little time to dedicate to it. My last semester I was dealing with:
- 4 other intense classes
- 2 group projects, including this one
- helping run a club
- working 20 hours a week doing my research
- coordinating my graduation plans
I also had… absolutely no idea what I was doing. It was my first time trying to reverse-engineer an NES game, and it turns out assembly was a lot tougher than I remembered! There was a lot to learn, and no time to understand it all. So, I want to study this project, and explore what I could’ve done better, and either update the old GitHub or create a new one!
What is the Final Project?
In our original school project, my teammate focused on adding wallkicks, while I was given the task of adding the new rotations. Quite simply, I want to be able to finish what I started by adding in the missing rotations while not sacrificing any blocks from the game. I’ve also recently been inspired by other hacks I’ve seen for this game, so I may end up adding other mechanics too!
For the time being however a final hack will:
- add in the missing rotations for the I, S, and Z blocks
- be able to update the score and statistics in the game properly
There were also several difficulties with the development environment we used, which I plan on also fixing.
One last problem
This post is going to go into very technical details of just one aspect of this project that I’ve tried to fix since last week. But before we delve into that, it’s important to note one major technical challenge for this project, because I’m sure some people may already have a good suggestion for how we should’ve started this project. Normally, it’s great advice to just using an already decompiled version of the game to expedite translating the code. However, we had to…
Build Our Own Decompilation
We just didn’t think we could feasibly or ethically get away with using an already decompiled version of this game. Again, this was a reverse-engineering class, the whole curriculum was about using tools like Ghidra and hex editors to be able to dissect and translate disassembled files.
Me and my teammate both agreed it would’ve been moot and not in the spirit of the class to use a decompilation that essentially did all of this for us. However, this would be a significant issue because you tend to lose a lot of information when disassembling any executable from scratch. Most, if not all, variable and function names are gone, and for these ancient NES games those names served as HUGE hints for understanding functionality. Oh, and comments? No, no comments remain here. This is barren land, and it made the project exponentially harder.
So, where do we start?
If we’re gonna do this project justice, we need to start with the basics, that being the development environment and configuration file itself. Our development environment is simple enough, containing all the tools we’d need, like an assembler, disassembler, procedures for both, and a way to play the game. Fortunately, with the help of a masterful tutorial, this part was relatively easy. Again, this environment can be found on the GitHub.
However, my first issue came when I realized that we would need to describe a custom config file for the assembler to properly create an playable file. I don’t remember how I learned to program this but, after researching NES development and doing lots of chats with Claude, I’ve found some massive problems with the original:
SYMBOLS {
    __STACKSIZE__: type = weak, value = $0300;
}
MEMORY {
    ZP:     file = "", start = $0002, size = $001A, type = rw, define = yes;
    HEADER: file = %O, start = $0000, size = $0010, fill = yes;
    ROM0:   file = %O, start = $8000, size = $7FFA, fill = yes, define = yes;
    ROMV:   file = %O, start = $FFFA, size = $0006, fill = yes;
    ROM2:   file = %O, start = $0000, size = $4000, fill = yes;
    SRAM:   file = "", start = $0500, size = __STACKSIZE__, define = yes;
    RAM:    file = "", start = $6000, size = $2000, define = yes;
}
SEGMENTS {
    ZEROPAGE: load = ZP,              type = zp;
    HEADER:   load = HEADER,          type = ro;
    LOWCODE:  load = ROM0,            type = ro,  optional = yes;
    ONCE:     load = ROM0,            type = ro,  optional = yes;
    CODE:     load = ROM0,            type = ro,  define   = yes;
    RODATA:   load = ROM0,            type = ro,  define   = yes;
    DATA:     load = ROM0, run = RAM, type = rw,  define   = yes;
    VECTORS:  load = ROMV,            type = rw;
    BSS:      load = RAM,             type = bss, define   = yes;
    CHR:    load = ROM2,            type = rw;
}
FEATURES {
    CONDES: type    = constructor,
            label   = __CONSTRUCTOR_TABLE__,
            count   = __CONSTRUCTOR_COUNT__,
            segment = ONCE;
    CONDES: type    = destructor,
            label   = __DESTRUCTOR_TABLE__,
            count   = __DESTRUCTOR_COUNT__,
            segment = RODATA;
    CONDES: type    = interruptor,
            label   = __INTERRUPTOR_TABLE__,
            count   = __INTERRUPTOR_COUNT__,
            segment = RODATA,
            import  = __CALLIRQ__;
}
In the end, I was able to switch my config file out for the one in the completed decompilation, but in the process was able to learn everything that I should have when it comes to these config files. Here’s the current config file:
MEMORY {
    HDR: start = $0000, size = $0010, fill = yes, fillval = $00;
    PRG: start = $8000, size = $8000, fill = yes, fillval = $00;
    CHR: start = $0000, size = $4000, fill = yes, fillval = $00;

    ZP:  start = $0000, size = $0100, type = rw, file = "";
    RAM: start = $0100, size = $1F00, type = rw, file = "";
}
SEGMENTS {
    ZEROPAGE: load = ZP,                 type = zp;
    BSS:      load = RAM,                type = bss;
    HEADER:   load = HDR,                type = ro;
    CHR:      load = CHR,                type = rw;
    CODE:     load = PRG,                type = ro;
    VECTORS:  load = PRG, start = $FFFA, type = ro;
}
That’s it! It’s much more readable and does the exact same thing as the old one. The two biggest issues came from:
1) Cross-referencing with the completed disassembly I linked to earlier, and looking at the ld65 documentation, the FEATURES and SYMBOLS sections seem to be entirely optional. We can remove these without issue
2) I had no idea what the MEMORY or SEGMENTS sections did, but after much research and chatting with other developers and Claude AI, I’ve come to understand it much better
What I’ve learned so far
NES ROMs all use the iNES file format, and in that format we’re mostly concerned with the following sections:
1) Header (describes overall file layout, 16B)
2) PRG ROM data (code and data banks, 16KB per bank)
3) CHR ROM data, if present (graphics banks, 8KB per bank)
MEMORY Section
In the NES, the PRG ROM is interpreted by the CPU, whereas the CHR ROM is interpreted by the PPU (Picture-Processing Unit). In the CPU, the PRG ROM is given addresses $8000-$FFFF, and the graphics start immediately in the PPU. This is what the MEMORY section in our config is for, it essentially gives the correct labels to our PRG and CHR banks in our file to our header, so that emulators can do the correct address math. You’ll notice the line:
PRG: start = $8000, size = $8000, fill = yes, fillval = $00;
follows the exact standards of the NES’s CPU, starting at the correct address and filling 2 banks (32KB total). It’s also why we give the CHR ROM start = $0000, even though iNES dictates that CHR ROM goes after PRG ROM. It’s because this start is for the PPU, not the CPU!
Also, As I found through painful experimentation, it’s also very important you have the header, program data, and character data listed in that exact order, as otherwise the header will tell basically emulators that the program data is located where the character data is, and vice-versa, making the game unplayable.
SEGMENT Section
As for the SEGMENTS section, this simply goes through our code, looking for the segments in it’s list, and loading those segments to the correct areas of memory. So, our CODE segment will correctly load into the PRG-ROM section, and so on.
One important distinction is the VECTORS segment, which holds the data for initializing the game when the console powers-on, and more. If the game doesn’t have the correct location for these pointers, then the game won’t be able to start correctly. This is going to be located in our PRG ROM, but we need the emulator to know exactly where, hence the start variable. Doing some math we can see that, in our final NES file, the location of the vectors will be:
     $FFFA (location in emulated CPU's memory)
    -$8000 (location of PRG-ROM in emulated CPU's memory)
    ------
    =$7FFA (file offset into PRG-ROM)
    +$0010 (addition file offset from header)
    ------
    =$800A (file location of VECTORS)
Looking at $800A in the hex editor for our compiled NES file, you’ll find 6 bytes, 2 for each pointer for the three vectors your game needs to start!
Summary
- The config file is responsible for detailing the correct specifications to be stored in the final ROM so that corresponding emulators can play the game correctly
- The
SEGMENTSsection starts by correctly assigning the segments to theMEMORYareas the emulator will look through.CODEgoes to PRG andCHRgoes to CHR. - The
VECTORSsegment is given further information so you can still find it even when hidden in the program data - The
MEMORYsection gives the correctstartandsizespecifications to adhere to NES address math - The combination of the two results in a playable file
What’s next?
In the old project, another significant challenge was that, for some reason, when adding or removing code in the middle of the PRG-ROM data, the game would show a blank green screen upon startup. Observe! The green screen of death and my current debugging attempt:
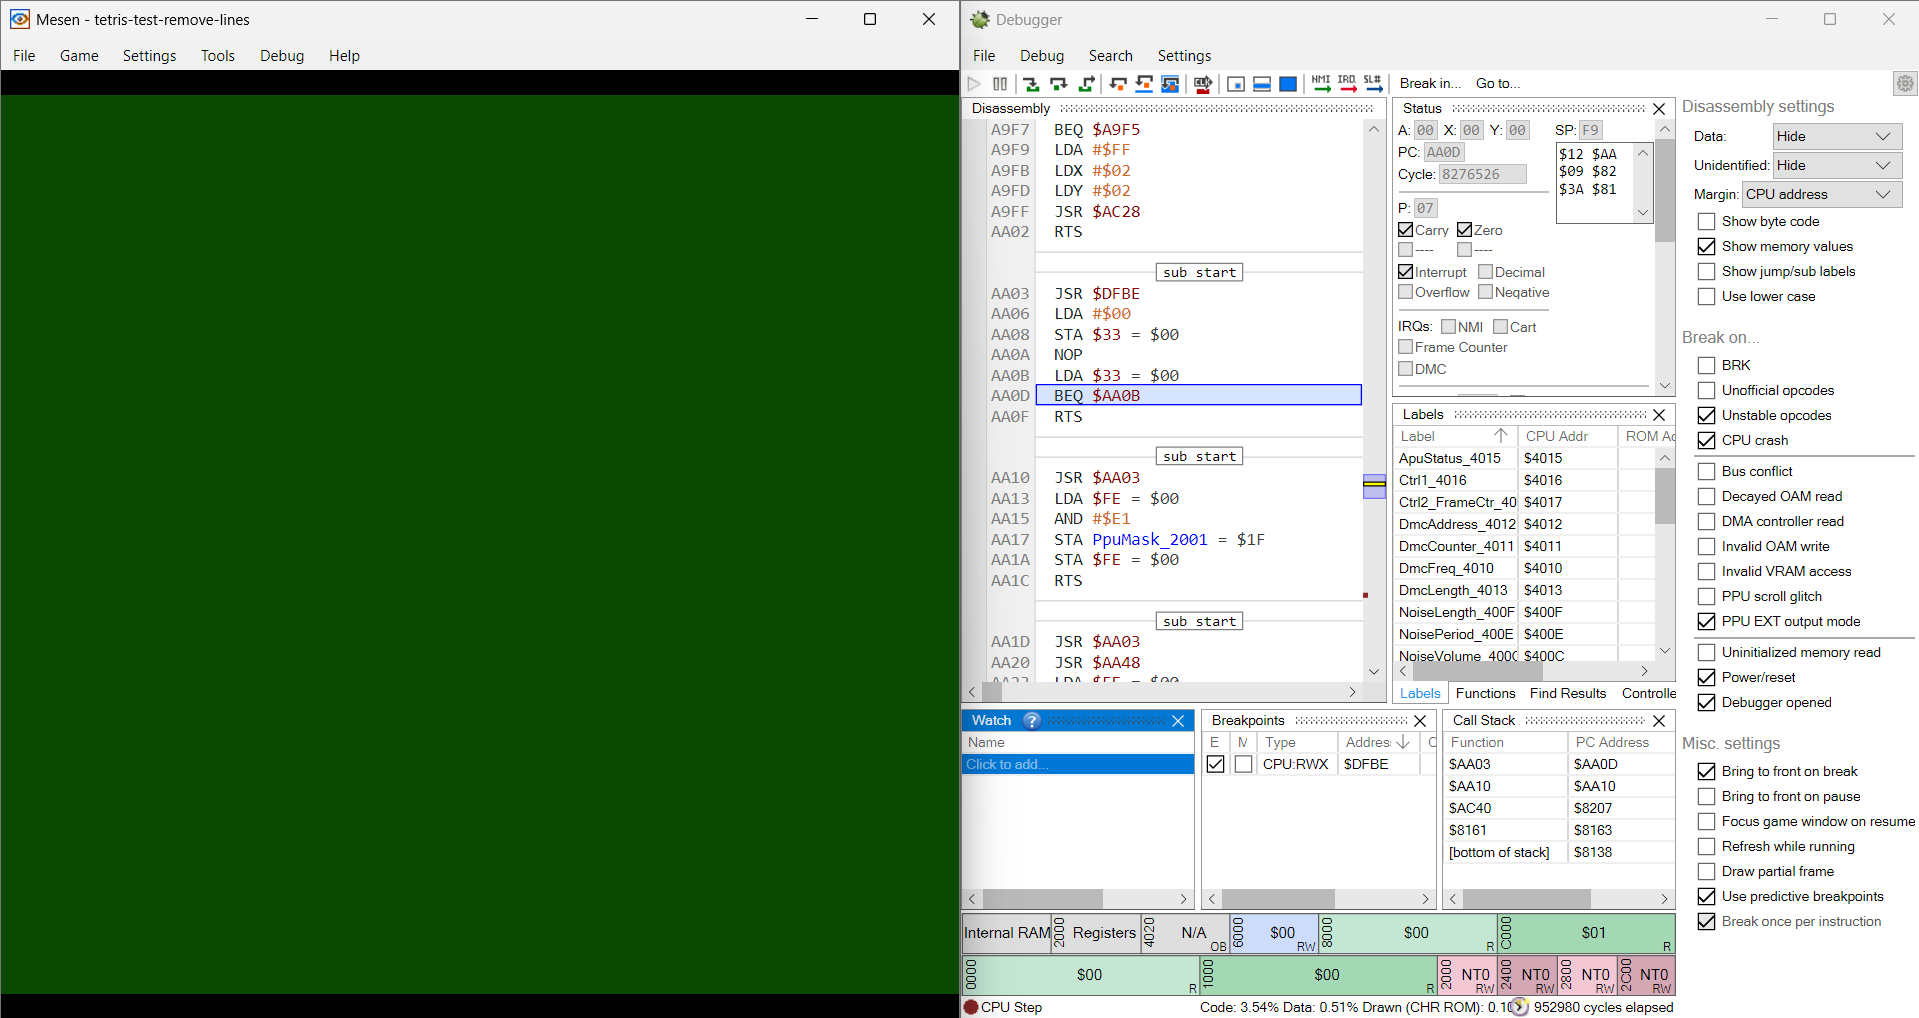
This made development even more impossible, as we had to be insanely careful with how we were writing code. We had to add our functions to the end of the established code, add padding bytes where needed, and be very careful if we ever did write code in the middle of the PRG-ROM segment.
Upon revisiting this project, I had a new theory, that if I fixed the config file to more forcefully insert our VECTORS data, that we would make it past start-up. After all, these are the pieces of data that deal the most with when the game first boots-up. Surely, if I fixed this config then I would be able to add and remove code as needed!
Unfortunately, that’s not the case. When trying to remove certain functions that go completely unused in the game, this green screen of death happens more than you’d ever want. I’ve tried changing the config file, the assembler and disassembler settings, and more, but still nothing. At this point, there are two paths in front of me:
1) Continue debugging and making my own disassembly work
2) Start working and hacking on an already finished disassembly
I’ve yet to decide, but will make up my mind in the following weeks.
Final Thoughts
This is a very hard project, but also greatly touches upon what I love about these retro games. I feel that it’s often very easy to take what society offers for granted. There have been so many times in my life where I’m walking through the city and stop for a brief moment, gazing at a building, only to say to myself,
“Wow, look at all those bricks, all just on this one wall. There are dozens here, that had to be made, transported, and glued in place here. Then you have to do that for all the other walls, and that’s not even considering the foundation, or roof, or floors, or anything else. This single wall of bricks is amazing, I don’t think I’ll ever take walls like this for granted ever again.”
But we do. We do forget just how extraordinary the ordinary is, and who can blame us? Life is hard enough, and if we spent all day only focusing on what came before, we wouldn’t get anywhere. In the world of computers, it’s incredibly easy to take things like memory or computing speed for granted. Gigabytes are in places where megabytes used to be a dream, and processors are always faster than before. Even the languages we code in are readable and at least somewhat akin to the tenets of English!
Then you go back just 40 years ago. You look at the intense rigidity and limitations developers had to work with. You see how important every single byte was, you see the ingenious tricks and techniques they had to do just to make stuff show up on a screen. The ROM file for Super Mario Bros. is 40KB, that’s about as much as a single screenshot of a game!
These games are… black magic. By all limits and reason, they shouldn’t exist. Why go to so much trouble? Why do so much for so little?
Because to create anything meaningful and to do it well is to embrace the restraints. To do as much as you can with the limited tools at your disposal, to force yourself to be that good. Then, and only then, should your artistic shackles become removed. Just like when I was a kid, you don’t get to use the calculator if you don’t know how to multiply by yourself.
I love magic, and these older games are it. They take nothing, and make everything out of it.
“I think that inside every adult is the heart of a child. We just gradually convince ourselves that we have to act more like adults.” Shigeru Miyamoto